Friday, October 28, 2011

Halloween Sugar Cookies


Sugar Cookie
2 cups sugar
1 cup sour cream
1 c butter
2 eggs
1 tsp. soda
1 tsp baking powder
1 tsp vanilla
4 1/2 cups to 5 cups flour (for soft dough)
nutmeg (if desired)

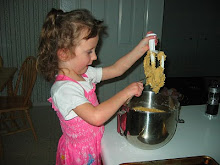
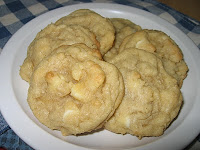
Cream together sugar, sourcream, butter, and eggs. Add soda, baking powder, vanilla and flour. Add nutmeg if desired. Roll on slightly floured surface. Cut into desired shapes. Bake at 350 degrees for 10-12 minutes or until slightly browned.

Cookie Recipe came from a CD of recipes Jim got for me a long time ago. The Sour Cream helps keep the cookies soft for several days.

Powder Sugar Frosting
4 cups powder sugar
1/2 cup shortening or butter
5 tablespoons milk
1 teaspoon vanilla extract
food coloring

In a large bowl, cream together the powder sugar and shortening (or butter) until smooth. Gradually mix in the milk and vanilla with an electric mixer until smooth and stiff, about 5 minutes. Color with food coloring if desired.

The frosting recipe came from Allrecipes.com. I put the alternate use of butter because that's what I use when I make it. If frosting is too thin add more powder sugar. If too thick add more milk a few drops at a time.


Wednesday, October 26, 2011

Halloween Birthday Cake


Thursday, October 20, 2011

Mimi's Corn Chowder

I found this recipe HERE!
3 slices of crispy cooked bacon, crumbled
1/4 cup onion, diced
2 cups creamed corn
1 cup chicken broth
1 pint light cream**
6 saltine crackers, crushed
1 cup shredded cheddar cheese
16 oz pkg frozen diced potatoes
salt and pepper to taste

Mix all ingredients together in a slow cooker. Cover and cook on LOW for 3-4 hours or until potatoes are tender. Serve with your favorite soup crackers!

*Recently I went to Mimi's Restaurant and had their Corn Chowder! I love cream soups...especially Corn Chowder because no one really make Corn Chowder any more. Anyway, as I was doing my "Blog Surfing" the other morning I accidentally found this recipe for Mimi's Corn Chowder! I was so excited so I of course had to try it! It was really yummy! So glad I doubled the recipe so we could have left overs!

**Ok, because I am cheap and won't pay almost $4.00 for 1 pint of cream, I decided to pay just over $3.00 for a gallon of whole milk and used that instead of the cream. After letting the soup cook for 3 hours, it wasn't thickening like I wanted it to (because I added milk instead of cream). So I created a Rue with 1/4 cup melted butter and a 1/3 cup flour (for a double batch). Then drained some of the milky part of the soup off the soup, added it to the rue, mixing it till all the lumps are gone. Add enough of the milky part of the soup to the rue until it is pourable, but still thick. Pour the Rue mixture into the crock of soup. Give it a stir and let it cook that last hour. 

Monday, October 17, 2011

Do You LOVE Accessories?!

I just have to share this FABULOUS opportunity!
Are you looking for a little extra income...or maybe even more than a little extra?
Do you LOVE ACCESSORIES?

A few months ago a girl I grew up with posted some pictures on FB of some jewelry. I browsed through the pictures and thought, "Wow, I LIKE this stuff!" Then I saw how much it was....$5! No LIE! $5!
My friend had just become an independent consultant for Paparazzi. Without even seeing the Jewelry first hand, I got really excited about what she was doing and thought, "I could do this too!" I checked into the terms and conditions of becoming a consultant and then became even more excited. Here are the things that first intrigued me about becoming a Paparazzi Consultant:
*Extra Income
*I carry and own my Inventroy
*The Jewelry and Accessories are very Stylish
*It's only $5!!!
*It sells itself...No demonstrations/speeches
*I can sell when I want, as much as I want
------------------------
So, I signed up and since then have learned so many more fabulous things about Paparazzi!
*Paparazzi just started having independent consultants in the last year. There is so much room for growth in the company!
*I, as a consultant have a downline. Which means more money making opportunity!
*There is a fabulous group of Consultants on FB that are all willing to help each other. We ask questions and answer others questions. Such a great resource for those just getting started and for those that have been doing it for awhile that need new ideas!
*And this stuff SERIOUSLY SELLS ITSELF! I have done two home shows (1 1/2 hours each) and I have profited just over $200 on each! I sat up a display in my front yard the other day for 45 minutes...without any advertising I took in $70! I now have people just stopping by to see what I have!

Ok, OK!! I will show you a sampling of what there is!
Necklaces!


 Earrings!

 Braceletes!

 There are also hairclips, headbands, and rings along with some children's jewelry. To see more pictures go to My facebook PAGE...Paparazzi Jewelry By Kristi.
Independent Consultant #1347


Thursday, October 13, 2011

Candy Corn Rice Crispy Treat

I am so excited with how these turned out! Once I decided what to do, they were easy and were made with in 30 minutes or less!
*******************
1 bag (about 2 cups) white chocolate chips.
orange and yellow sprinkles
1 batch of rice crispie treats
         -1 bag regular size marshmallows
         -1/4 cup butter/margarine
         -8 1/2 cups rice crispy cereal
               Melt butter in large microwave safe bowl for 30-45 secs. Add Marshmallows to butter and stir to coat marshmallows with butter. Place Marshmallows back in microwave on high for 1 1/2 minutes. Take out, stir marshmallows till smooth. Add rice crispy cereal to marshmallows mix til all cereal is incorporated. Press into a well buttered 9x13 pan. (I sprayed my pan with cooking spray and it worked great!) Let cool.

After making the rice crispy treats I cut them into a triangle. (Cut rice crispies into squares then cut each square diagonally). Shape them into a candy corn. Melt chocolate according to directions on package. Pour some onto a small plate. Dip the top of the rice crispy into the chocolate....coating it well. Then add your sprinkles in the section you want to. I started with the yellow then did the orange. Do your sprinkles before the chocolate sets up then place on wax paper and let the chocolate set up. And VOILA! You have a yummy, fun, and easy treat to take to your kids class!

**I didn't have any yellow sprinkles so I made my own! It was SO easy. I poured about 1/8-1/4 cup of regular sugar into a bowl. Dropped 3 drops of yellow food coloring in and stirred till all the sugar was yellow. It worked perfect! I will definitely be using this trick again!


SASSY SITES!

Tuesday, October 11, 2011

Breaded Pork Chops


6 pork chops
2 eggs
1/2 cup milk
1-2 cups Dried Bread Crumbs

Combine eggs and milk, whisking very well, creating an egg wash. Pour some bread crumbs onto a plate. Completely dip pork chop into egg wash. Then remove from egg wash and coat it in bread crumbs. Then dip in egg wash again and then bread crumbs again making sure it is completely covered in bread crumbs. Fry in a hot skillet (use a couple TBLS of oil/margarine to fry with) for 2 minutes on each side. You want the outside edges to be golden brown, but you are not cooking it all the way through. Place browned pork chops in a baking dish and bake at 350 degrees for 30-40 minutes. My pork chops are usually 1" thick. If yours are thicker you may want to cook them longer. Just make sure there is no pink in the middle.

**This was the first recipe that I remember making for Jim when we were first married....that didn't come from one of our Mom's. And it was so Yummy! I remember being so excited that I created something that was sooo good!

**I like to buy the big Pork Loins from Costco and divide them up into a couple roasts and several pork chops. There are even cutting directions on the package if you want to try to do this. It saves money! I think I pay around $20 for the Pork Loin and can get 2 roasts and 12 pork chops out of it. Enough for 4 dinners plus there are usually left overs from the roast to make into BBQ Pork Sandwiches for another dinner!

Halloween Table Topper

I bought this fabric a year ago and finally made my table topper!


Monday, October 3, 2011

Cheesy Garlic Twists

Pizza Crust Dough
Garlic Butter
     (1/4-1/2 cup butter or margarine softened. Stir in 1/4 tsp garlic powder.) 
1-2 cups Mozzarella Cheese
Italian Seasoning

On a lightly floured surface, roll dough out in a rectangle shape.  Spread Garlic Butter over dough. Top with Mozzarella Cheese. Starting with long edge of dough, roll dough up like you would when you make cinnamon rolls. Slice rolls off end (about 1 1/2" thick). To make into stick/twist, grab a hold of opposite sides of the roll (not the edges that have been cut) and genlty pull to stretch it. When it's long enough to put a twist in it, then twist it once and place on a greased baking sheet. Sprinkle lightly with some Italian Seasoning. Let rise till almost doubled in size. Bake at 350 degrees for 20 minutes or until golden brown. Serve with warmed pizza sauce. 

*These are so yummy! And easy! A big hit with the kiddos too!

Related Posts Plugin for WordPress, Blogger...

Top 5 Most Viewed