Thursday, October 18, 2012

Quick and Easy Breadsticks


Recipe taken from Jamie Cooks it Up Blog.

1 1/2 C warm water
2 T sugar
1 T yeast
1/2 t salt
3 1/2- 4 C flour
1/4 C butter
3/4 C grated Parmesan or mozzarella cheese

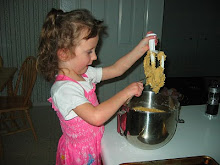
1. Mix the water, sugar and yeast together in a measuring cup or in the bottom of your mixer. Let it sit for 5 minutes.
2. Add the salt and the flour, one cup at a time, until it is well incorporated. Mix on high for 5 minutes. Let the dough rest for 5 minutes.
3. Melt the butter and pour half of it into a jelly roll pan (large cookie sheet).
4. Place the dough in the center of the pan. Let it sit for 2 or 3 minutes. Letting the dough rest makes it MUCH easier to shape.
5. Spread the dough out flat onto the pan until it reaches all of the edges. Doing all of the spreading and cutting of these bread sticks, in the pan makes cleaning up your counter so much easier!
6. Pour the other half of the butter onto the dough. Spread it around with your hands. Sprinkle the Johnny's Garlic Seasoning all over the dough, and then the Parmesan cheese.
7. With a pizza cutter cut the dough into three rows lengthwise, and then into about 12 little height wise rows.
8. Put the pan into a 170 degree oven for about 7-10 minutes. The breadsticks should rise about 1 inch.
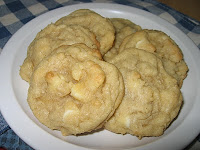
9. Turn you oven up to 350 and bake for about 12 minutes, or until golden brown.
10. When they come out of the oven let them sit and rest again for about 5 minutes. Then redefine your cutting lines with the pizza cutter.

**I copied and pasted this recipe....because I LOVE the step by step instructions. These are so easy and so Yummy!!

Monday, October 15, 2012

A friend back in Carson City does a Halloween Party every year for all the kids/moms in the ward. It is so much fun and there are alot of creative treats made. Here are pictures from lastyears. Maybe they will give you ideas for fun treats for your Halloween Party!!
***********
Rice Crispy Candy Corns (My Kreation)

 Mummy Pizza
The kids can make these themselves!

Veggie Skeleton...some of it had been eaten by the time I got the picture. 

 If you look at the apples in the back, they are a mouth with teeth. I think she used slivered almonds for the teeth. As the apple browns a little the mouth looks even better!

 Cake Cemetary...Always a favorite with the kids.

I would love to see some of your Halloween Kreations! Post your pics on my Kristi's Kitchen Kreations FB wall! And who knows...there might be a prize for my FAVORITE KREATION!!

Wednesday, October 3, 2012

Holiday Wreaths

Just wanted to share some wreaths that I made. I'm so excited to use them this fall and Christmas!


For every burn to the fingers with the Hot Glue Gun we got a cookie.......I won't tell you how many cookies I got! But I think there were a few others that had quite a few cookies too! OUCH! ;)
I do not take credit for the design/idea of these wreaths...just that I made these two.

7 Up Biscuits


2 c Bisquick mix
1/2 c sour cream
1/2 c 7up
1/4 c melted butter
Preheat oven to 450ยบ
Cut sour cream into your Bisquick mix, then add 7up - it will make a soft dough. Now sprinkle your counter with a little Bisquick mix then add dough and pat it out.
Melt butter and pour it into a 9" square baking pan. Cut your biscuits up and arrange them in pan on top of melted butter.
Bake 12-15 minutes or until golden brown.

**I first tried these at a friend's house and I LOVED them! So I looked on Pinterest for the recipe and found this one taken from THIS BLOG.  They are very easy to make! Try them out and let me know what you think!
Related Posts Plugin for WordPress, Blogger...

Top 5 Most Viewed