Showing posts with label yummy treats. Show all posts

Wednesday, May 22, 2013

Praline Cheesecake Squares

Recipe shared with me by Holly M.

24 servings

Crust ingredients:
1 1/4 cups flour
1/2 cup melted butter
1/3 cup finely chopped pecans
1 Tbsp. powdered sugar

In a large bowl combine crust ingredients. Mix well then press into the bottom of an 8x8 baking dish. Bake at 350 degrees for 15-20 minutes or until crust is set and light golden brown around the edges.

Cheesecake ingredients:
12 oz. softened cream cheese
2 eggs
2/3 cup sweetened condensed milk
1/3 cup granulated sugar
1 tsp. vanilla

In a large mixing bike beat cream cheese with an electric mixwe on low to medium speed until smooth. Add eggs; beat well. Beat in sweetened condensed milk, granulated sugar and vanilla.  Pour over baked crust. Bake in a 350 degree oven for 35 to 40 minutes until set. Cool in pan on a wire rack.

Topping ingredients:
1/2 cup packed brown sugar
1/2 cup whipping cream
1/2 cup chopped pecans
1 tsp. vanilla

In a medium saucepan combine brown sugar and whipping cream. Cook and stir over medium heat until mixture boils; reduce heat. Simmer, uncovered, for 10 minutes. Remove from heat. Stir in chopped pecans and vanilla. Pour over cheesecake. Cover and chill for 2 to 24 hours before serving. Cut into 1 1/2-2 inch squares.
*To make a regular 9x13 pan just double the recipe.

***OH HEAVEN!! I first had this yummy dessert at a baby shower that was thrown for me 7 years ago. I of course asked for the recipe from my friend. It has become the dessert that I request for Mother's Day. And just maybe I will share with those close by!
 

Thursday, August 16, 2012

Key Lime Bars


Crust:
5 ounces animal crackers (about 2 1/2 cups animal crackers)
3 tablespoons packed light brown sugar
Pinch salt
4 tablespoons butter, melted

Filling:
2 ounces cream cheese, softened to room temperature
1 tbsp grated fresh lime zest (from about 2 limes)
1 can (14-ounce) sweetened condensed milk
Pinch salt
1 large egg yolk
1/2 cup fresh lime juice (from about 3-4 regular limes or 20 Key limes)

3/4 cup shredded coconut, toasted (optional)

Preheat the oven to 325 degrees, adjusting an oven rack to the middle position. Line an 8-inch square baking pan with aluminum foil, letting two opposing edges hang over at least an inch or so. Grease the foil with cooking spray.
For the crust, process the animal crackers, sugar and salt together to fine crumbs in a blender or food processor. Drizzle the melted butter over the crumbs and pulse to incorporate (or stir together in a bowl with a fork). Sprinkle the mixture into the prepared pan and press the crumbs into an even layer. Bake the crust until fragrant and golden, about 15-18 minutes.
For the filling, while crust bakes, in a medium bowl, stir the cream cheese, lime zest and salt together until combined. Whisk in the sweetened condensed milk until smooth (you can use a handheld electric mixer, if you want). Whisk in the egg yolk and lime juice until combined.
Pour the filling evenly over the crust. Bake the bars until the filling is set and the edges just slightly begin to pull away from the sides of the pan, 15-17 minutes.
Let the bars cool completely in the pan set on a wire rack, about 2 hours. Then cover the pan with foil and refrigerate until chilled, about 2 hours. Remove the bars from the pan using the foil overhang and cut into squares. Sprinkle with toasted coconut if desired.

** OH MY!! I am such a lover of Key Lime! These were so scrumptious! I do think the crust was a little too thick. I measured 2 1/2 cups of animal crackers. Next time I will try the 5 oz and see if there is a difference.
**I found this recipe on Pinterest. It came from Mel's Kitchen Cafe! One of my favorite sources!

Wednesday, May 9, 2012

Easy Black Bottom Cupcakes


*1 Milk Chocolate Cake Mix
         Mix up cake batter according to directions on package.

*1 (8 ounce) package cream cheese, softened
*1 egg
*1/3 cup white sugar
*1/8 teaspoon salt
*1 cup chocolate chips (can use semi-sweet or milk chocolate)
         Combine cream cheese, egg, sugar, salt and chocolate chips.

Line a muffin pan with cupcake liners. Place about 1 TBS of cream cheese mixture in each cup. Make sure there are a couple chocolate chips in each one. Fill the cup to 2/3 full with cake batter. Bake according to cupcake baking time on cake mix package. Let cool and frost with your favorite chocolate frosting!

**Do you know how kids only take cupcakes so they can eat the frosting?...Well, not with these! The kids gobbled the whole thing up! They went really fast!

**I used the Hershey Kiss Chocolate Chips because I liked having the little bit bigger chocolate chip in them. Definately making these again soon.

**I give credit to my Sister, Julianne for this recipe and also, Allrecipes. com. Julianne made some like these for a family gathering a few years back and I LOVED them. So I searched for the recipe, found the cream cheese part on Allrecipes. com and put them together.

Friday, January 6, 2012

Lemon Bars


1 cup butter, softened

1/2 cup white sugar

2 cups all-purpose flour

4 eggs

1 1/2 cups white sugar

1/4 cup all-purpose flour

2 lemons, juiced


Directions

  1. Preheat oven to 350 degrees F (175 degrees C).
  2. In a medium bowl, blend together softened butter, 2 cups flour and 1/2 cup sugar. Press into the bottom of an ungreased 9x13 inch pan.
  3. Bake for 15 to 20 minutes in the preheated oven, or until firm and golden. In another bowl, whisk together the remaining 1 1/2 cups sugar and 1/4 cup flour. Whisk in the eggs and lemon juice. Pour over the baked crust.
  4. Bake for an additional 20 minutes in the preheated oven. The bars will firm up as they cool. For a festive tray, make another pan using limes instead of lemons and adding a drop of green food coloring to give a very pale green. After both pans have cooled, cut into uniform 2 inch squares and arrange in a checker board fashion.
**OH MY! These are SOOOO Good! One of my good friends shared this recipe with me. Thank you Alison for sharing! This recipe is quick and easy! I dare you to eat just one! So glad I was able to share these ones or I would have eaten the whole tray.

Pin It

Thursday, December 8, 2011

Guest Post...Chocolate Covered Pretzels

I am so excited to share with you a post from one of my friends. She is very talented and has so many creative ideas. After you read her post, go check out her blog at Green Eyed Girl Crafts and then you will be able to see for yourself how talented she is! Thanks Vicki for sharing your talents with us!
**********
Hello Kristi's Kitchen Kreations friends... my name is Vicki ~ aka The Green Eyed Girl ~ and I am NOT a cook in any way ~ shape or form...I can't make delicious meals and have them turn out beautiful like Kristi... but I dabble a little in treats and traditions. Pretzels because a tradition when Kendra became part of our little family it's not official yet... but maybe she will want to serve them at their wedding reception...lol). We've made them for Valentines, Clover Day, Easter, 4th of July, Halloween and now Christmas. We are still learning... but we are getting better each and every time we make them.  Thank you Kristi for asking me to guest post... it's a first for me... and it's been fun!
Bagged and ready for delivery...
Warming the chocolate...
Note the jar Josh is pulling the pretzels from
Getting their chocolate coating...
Some had sprinkles...
Some had more chocolate...
The production line...
They were stacked everywhere...

In keeping with the Johnson family tradition of chocolate covered pretzels... we bought 2 of the big containers from Sams Club that had cute stars, trees and bell shapes (see top picture) for about $8.00 each plus about 8 pounds of white chocolate and in a matter of about 90 minutes we had over 1,200 of those bad boys completed and ready for delivery!

We are getting better with the "production" each and every time we make them. This time we decided to melt the chocolate (we bought 2 pound blocks instead of the chips) in the microwave first and then put the melted chocolate into the frying pan (it was on low) we found that this makes the chocolate stay warmer and the pretzel don't end up "swimming" in the chocolate because most of it will drip off and back into the pan... and we didn't have to keep re-heating the chocolate on the stove in the double boiler.  After they were dipped we put them on a waxed paper covered cookie sheet and moved over to the "decorating" section of the kitchen.

Our next big ah-ha moment was with the decorating bags. I had previously bought bottles (they looked like smaller ketchup bottles you use at a ballgame). Kendra would put several Wilton Candy Melts into the bottle and would microwave them until melted... stirring them constantly and sometimes they would burn a little because it was taking forever to get them to melt completely. This time I bought the Wilton Decorating Bags (I think there were 10 of them for $4.00)... these worked like a charm.  Kendra put several Candy Melts in the bag... zapped them for the time called for and then would "massage" the bag until all of the Melts were melted completely... then she snipped a very small piece off of the bottom and voila... the perfect decorating tool! (it's better to take just a little snip off ~ you can always snip off more if you want later).

Josh thought it was taking to long to just decorate each individual pretzel and decided they should just sweep across the whole tray with several passes back and forth with each of the colors. With this new idea they were much faster decorating than we were dipping and honestly... they looked just as good as when each one was done on its own!  Some of the pans Josh and Kendra used just the sugar sprinkles and others they did just the Candy Melts and on some they did both... they all looked so festive and tasted so good!

The pretzels would have set up a lot faster had my mom not cranked up the temperature to 86* in my house. Apparently when my mom and dad first arrived (Kendra and I were both running late at work and Josh was in the shower) my mom decided that it was a little "chilly" so she proceeded to crank up the heat to 86*... She claims she didn't hear the furnace kick on... so she just keep pressing the "up" button.  Josh was the one who noticed how hot it was getting and discovered that it was 86*. He first accused me of cranking it up and then my mom started laughing... she knew she was busted! Needless to say it gave us all a great laugh for the evening!

I hope that you and your family have at least one "fun" thing to do in the kitchen that everyone can do together... oh and don't forget to have your favorite Christmas carols playing in the background... you will be making memories for years to come!
Merry Christmas!
 

Monday, November 14, 2011

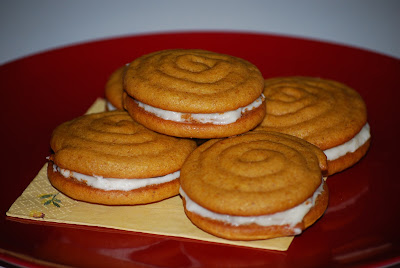
Pumpkin Creme Pie Cookies

For Creme Pies:
1 cup brown sugar
1 cup white sugar
1 cup vegetable oil
1 can pumpkin (15 Oz.)
2 eggs
1 tsp vanilla
3 cups four
1 tsp baking soda
1 tsp baking powder
1 tbsp cinnamon
1 tsp ground ginger
½ tsp salt
½ tsp ground nutmeg
¼ tsp ground cloves

For filling:
1 package cream cheese, softened (8 Oz.)
1/2 cup unsalted butter, room temperature
2 cups powder sugar
3 drops vanilla
2 dashes cinnamon

Beat together brown sugar, sugar, oil and pumpkin.
Add eggs one at time, mixing well after each addition, followed by the vanilla.
Slowly incorporate the dry ingredients into the wet until just combined.
Line a baking sheet with parchment paper.
Using a pastry bag with a round tip, or a big zip top plastic bag with one corner snipped, squeeze out circles of batter, starting from the middle and working outward until the circles are about 2-inches in diameter.
You can do larger than 2-inches or smaller as well.
Bake in a 350 degree fahrenheit oven for 11 minutes.
Cool on a wire rack.
------
While the cookies are cooling, make your filling.
 Beat together cream cheese and butter.
Add in powder sugar, vanilla and cinnamon.
Mix til smooth.
Frost flat side of one of the pies.
Top with another cookie.

**These are sooo SCRUMPTIOUS! I Love Cream Cheese and Pumpkin!
**I found this recipe on Pinterest which took me to Claudia's Cookbook Blog! Thanks Claudia for sharing this fabulous recipe!

Nap-Time Creations

Thursday, October 13, 2011

Candy Corn Rice Crispy Treat

I am so excited with how these turned out! Once I decided what to do, they were easy and were made with in 30 minutes or less!
*******************
1 bag (about 2 cups) white chocolate chips.
orange and yellow sprinkles
1 batch of rice crispie treats
         -1 bag regular size marshmallows
         -1/4 cup butter/margarine
         -8 1/2 cups rice crispy cereal
               Melt butter in large microwave safe bowl for 30-45 secs. Add Marshmallows to butter and stir to coat marshmallows with butter. Place Marshmallows back in microwave on high for 1 1/2 minutes. Take out, stir marshmallows till smooth. Add rice crispy cereal to marshmallows mix til all cereal is incorporated. Press into a well buttered 9x13 pan. (I sprayed my pan with cooking spray and it worked great!) Let cool.

After making the rice crispy treats I cut them into a triangle. (Cut rice crispies into squares then cut each square diagonally). Shape them into a candy corn. Melt chocolate according to directions on package. Pour some onto a small plate. Dip the top of the rice crispy into the chocolate....coating it well. Then add your sprinkles in the section you want to. I started with the yellow then did the orange. Do your sprinkles before the chocolate sets up then place on wax paper and let the chocolate set up. And VOILA! You have a yummy, fun, and easy treat to take to your kids class!

**I didn't have any yellow sprinkles so I made my own! It was SO easy. I poured about 1/8-1/4 cup of regular sugar into a bowl. Dropped 3 drops of yellow food coloring in and stirred till all the sugar was yellow. It worked perfect! I will definitely be using this trick again!


SASSY SITES!

Friday, July 22, 2011

Kettle Corn

This recipe came from The Savory Sweet Life

1/4 cup vegetable oil
1/2 cup popcorn kernels
1/3 cup sugar
3/4 teaspoon salt

Heat oil in a large pot over medium-high heat.  Add popcorn and sugar giving it a quick stir and then cover with lid.  Once popcorn starts popping, pick up pot and give it a quick shake every few seconds until popping slows down, between 3-4 minutes.  Remove immediately from heat and pour into a large bowl or spread on a cookie sheet.  Sprinkle with salt and ENJOY!  Do not make the mistake of removing the pot from heat without transferring to a bowl. Due to the high heat of the pot, if you don’t transfer the popcorn it will caramelize and perhaps burn.

**I LOVE how quick this is, and easy...but very easy to burn also.  My first batch I burned, but realizing that I let it stay on the heat two seconds too long, I made a second batch and it turned out GREAT!  Yes, it can burn in a matter of seconds.  It is better to have some unpopped kernals than to wait for them all to pop.....that is when they burn!

**DO NOT let the kids help make this.  It is too hot and if the sugar/oil gets on them it will burn bad.  It cools really quickly though so they can eat it!

Wednesday, July 13, 2011

Fruit Smoothie II (G&G Norman's Version)

1/2 banana (can be frozen)
1/2 cup fruit (any variety, be creative!)
1/4-1/3 cup fat-free strawberry yogurt
1/2-3/4 cup orange juice
2 Tbl lemon juice
*if you are using thawed/fresh fruit, add a couple icecubes.  I use frozen fruit.

Place all ingredients in blender/smoothie maker and blend till all ingredients are flowing smoothie through mixer.  Pour into cup and enjoy!  If you want your smoothie thinner add more orange juice.  If you want it thicker decrease the amount of orange juice.

**This is our new favorite treat when we go to G&G Norman's house! They have a Magic Bullet Smoothie Maker and can whip these up very quickly.  The base ingredients are the same as the fruit smoothie that I previously posted, but changing a few ingredients really makes a difference in the flavor.  The strawberry yogurt instead of plain, orange juice instead of milk, and the lemon juice really adds too it too!

**The Pictures speak for themselves.  These Smoothies are MMM, MMM, GOOD!
****
MORE PLEASE!
 The mark on the forhead is from her drinking from her cup and tipping it clear up til it is gone!

Tuesday, July 12, 2011

Don't have an Icecream Maker?!

I thought this idea was awesome! So many people like Homemade Icecream, but don't have an Icecream Maker, or can't justify buying one just to use it 1 or 2 times a year.  Follow your homemade icecream recipe to mix up the ingredients then mix it in your kitchen aid with the extra bowl underneath with the ice and rock salt.  Try it and see how it works for you!
This idea came from Savvy Sister Shops!

Thursday, June 30, 2011

Brownies


2 cups all purpose flour
1 1/3 cups unsweetened cocoa powder
1 teaspoon salt
8 large eggs
4 cups sugar
1 pound ( 4 sticks) unsalted butter, melted
1 tablespoon plus 2 teaspoons pure vanilla extract
2 cups coarsley chopped walnuts (optional)
2 cups ( 12 ounces) semisweet chocolate chips

1. Preheat the oven to 325 degrees.
2. Lightly grease and flour a 17 by 12 by 1-inch baking pan (I use a 12" X 18 "X 1" pan) and set aside. (I line pan with parchment paper then spray with cooking spray)
3. Sift together the flour, cocoa powder, and salt in a bowl and stir to mix.
4. Cream together the eggs, sugar, butter and vanilla in a separate bowl until well blended.
5. Add the flour mixture to the butter mixture and mix just until all the dry ingredients are moistened. Do not over mix.
6. Fold in the walnuts and chocolate chips and stir to blend. Spread the batter evenly into the prepared pan.
7. Bake 35 to 40 minutes, until the brownies are firm to touch. They will be slightly soft in the center when tested with a toothpick. Remove from the oven and cool about 40 minutes before cutting.
*I found this recipe on Skip to My Lou.  Since then I have seen it on two other blogs.  When a recipe calls for that much butter and chocolate....it has to be good!  And it is!  Oh MAN!  You need a full glass of ice cold milk with these BROWNIES!

Friday, May 20, 2011

Easy Strawberry Cheesecake

1 package cream cheese
1/3 cup powder sugar
2 cups thawed cool whip
1 graham cracker crust
1 lb carton of strawberries, washed and sliced
strawberry glaze or strawberry flavored Junket made up

Beat cream cheese and powder sugar then fold in cool whip.  Spread cream cheese mixture in the bottom of the graham cracker crust.  Stir together strawberries and glaze then pour strawberries over the cream cheese layer.  Let chill for a few hours then ENJOY!

*I love cheesecake and this is a quick, no fuss recipe!  When I had my first baby and my mom was staying with us helping me out, she made this yummy dessert.  It has been one of my favorites since.

*I really like homemade graham cracker crusts.  Here is the recipe I use for the crust.

GRAHAM CRACKER CRUST
1 package graham crackers finely crushes
1/4 cup sugar
3-4 Tbls butter or margarine melted

Stir together graham crackers and sugar.  Mix in melted butter completely. Press into a pie tin going up the sides too.  Bake at 300 degrees for 5-8 minutes.  Let cool before filling it.

Monday, April 11, 2011

Sugar Cookie Bars


1 cup butter at room temperature (2 cubes)
2 cups sugar
4 eggs
2 teaspoons vanilla
5 cups flour
1 teaspoon salt
1/2 teaspoon baking soda

Cream butter and sugar really well. Then add vanilla and eggs one at a time mixing well. Then add flour, salt and baking soda. Mix well. Spread in a 13X17 inch pan. Bake at 375 for about 15 minutes. After they are cool spread with your favorite frosting, cut and Enjoy!!!

This recipe was sent to me from one of my Best Friends from High School.  I used some Betty Crocker Cream Cheese Frosting then topped with some sprinkles.  OHHH YUMMM!  Good thing I only made a half cookie sheet size.  I ate most of them!  Thanks Ann, for sharing this yummy and easy recipe!

Thursday, April 7, 2011

IceCream Pie

1 Oreo Pie Crust
1 (1/2 gallon) container of Icecream
Whipped Topping
Caramel Sauce (or favorite sauce)

Let icecream set out on counter for 10 -15 minutes to soften.  When icecream is soft, spread it in the oreo crust.  Place in freezer and let set up for a few hours.  When ready to eat, top with whipped topping and sauce.

**We used mint chocolate chip icecream and regular chocolate chip icecream.  The regular chocolate chip icecream was our favorite.  Try your favorite flavor with your favorite sauce.

Friday, April 1, 2011

Orange Rolls

Want to try something different than the same Cinnamon Rolls?  These are fun so make and soo YUMMY!
Taken from:
Mel's Kitchen Cafe Orange Rolls
Dough:
¾ cup buttermilk, warm (I pour the buttermilk in a glass liquid measuring cup and microwave for 1 minute on 50% power)
6 tablespoons butter, melted and cooled
3 large eggs
4 ¼ cups (21 ¼ ounces) flour
¼ cup (1 ¾ ounces) sugar
2 ¼ teaspoons instant yeast
1 ¼ teaspoons salt
.
Orange Filling:
1/2 cup softened butter
1 cup sugar
2 tablespoons freshly squeezed orange juice
Grated orange rind/zest from two large oranges (reserving 1/2 teaspoon grated rind for the glaze below)
.
Orange Glaze:
1 1/2 cups powdered sugar
3 tablespoons freshly squeezed orange juice from about 1 orange
1/2 teaspoon grated orange rind/zest reserved from the filling above
.
For the dough, whisk the warmed buttermilk and butter together in a large liquid measuring cup. Combine 4 cups of flour, sugar, yeast and salt together in a standing mixer fitted with dough hook (or you can use a large bowl and mix with a wooden spoon or electric handheld mixer). With the mixer on low speed, add the buttermilk mixture and eggs and mix until the dough comes together, about 2 minutes. Increase the mixer to medium speed and knead the dough until it is smooth and elastic, about 10 minutes (knead for 15-18 minutes by hand). If after 5 minutes of kneading, the dough is still overly sticky, add 1/4 cup flour 1 tablespoon at a time until the dough clears the sides of the bowl but has a slight tacky feel when pressed between your fingertips. 
Place the dough in a large, lightly greased bowl and cover the top tightly with plastic wrap. Let the dough rise in a warm place until doubled, around 2 to 2 ½ hours, depending on the warmth of your kitchen.
For the filling, combine all the filling ingredients (reserving 1/2 teaspoon orange zest for the glaze) in a small bowl and mix well. Set aside.
When the dough is ready, turn it out onto a lightly floured counter (I use my trusty roul’pat for this step) and press it into about a 16 by 12-inch rectangle (if you have doubled the recipe, split the dough in half and roll out one half at a time). Gently brush the filling mixture over the rectangle, using an offset spatula or rubber spatula.
Lift the longest edge closest to you and begin rolling the dough into a tight log. Pinch the seam closed and roll the log so it is seam side down. Using a serrated knife, slice the log into 12 evenly sized rolls,more or less. You can slice them thinner or thicker as you like. For a traditional cinnamon-roll-look, arrange the rolls cut side down on a lined or lightly greased baking pan. If you want to try the twist method (see the pictures below), one at a time grab each sliced roll and holding on to either end simultaneously pull and twist the roll into a figure eight and place it on the prepared pan. Cover the rolls with lightly greased plastic wrap. Let the rolls rise in a warm place until doubled, 1 to 1 ½ hours.
Bake the rolls at 350 degrees for 22-25 minutes, until the rolls are lightly golden on top and cooked through. While the rolls are baking, mix together the glaze ingredients. Drizzle the glaze over the warm rolls.

Saturday, February 12, 2011

Valentine Rice Krispy Treats


I got the idea for this fun treat from another Blog I like to check out.

I made mine a little different.  I used Strawberry Marshmallows and just followed the microwave recipe on the back of the Marshmallow package to make the Rice Krispy part.  I used a heart shaped mold to shape them.  After letting them set for about 5 minutes I then carefully pushed a sucker stick into them.  I drizzled melted white chocolate over the top then added the sprinkles before the chocolate set up.  After they were set up I packaged them in bags with a ribbon.  Quick, and very easy! 

Ingredient list
1 package strawberry marshmallows
1 box rice krispies
Margarine
White Chocolate chips
Sprinkles.


Monday, January 31, 2011

Seven Layer Cookie (Bar)


Seven Layer Bars
In a bottom of a 9x13 cake pan, drizzle one stick of melted buttter.  Add in layers:
1 c. crushed graham crackers
1 c. shredded coconut
1 6 oz chocolate chips (I like to do half semi-sweet and milk chocolate)
1 6 oz butterschotch chips
Drizzle over top 1 can sweetened condensed milk, then sprinkle with 1 c. chopped pecans.
Bake at 350 degrees for 30-35 minutes, or until golden brown.   The top will be carmelized but the inside should be soft and yummy.
**This Recipe came from one of my followers!  Back in December when I did the last giveaway and asked the question about "what kind of cookie do you leave out for Santa", Jill answered with a SEVEN LAYER COOKIE!  I hadn't heard of a cookie before that was a SEVEN LAYER COOKIE, so Jill shared it with me so I could share with the rest of you.  Thank You Jill!  It was wonderful!


Friday, January 21, 2011

Worms (Candied Corn Puffs)

2 cups sugar
1 lb butter
1/2 cup water
1 TBLS white corn syrup

In heavy saucepan bring all ingredients to a full boil.  Boil for 15 minutes.  Pour over a 15 oz bag of Corn Puffs.  Stir till all Corn Puffs are coated then let cool and EAT!

**I got this recipe from my brother, Cory.  I remember him making this all the time when he was going to school in Cedar.  It is a very addicting treat.  Careful of the Sugar OVERLOAD!  Kids love it!
I have to stock up on the corn puffs when we go to Utah because I haven't been able to find them here in Carson City.

Wednesday, January 12, 2011

Cracker Jacks


2 cups Brown Sugar
1 cup Margarine or Butter
1/2 cup White Karo Syrup
1 tsp. Salt
1 tsp Baking Soda
5 quarts popped corn (I use 1 bag buttered microwave popcorn then the rest air popped).

In medium sized saucepan bring brown sugar, margarine, syrup and salt to a boil and boil for 5 minutes.  Remove from heat and add baking soda.  Pour over popped corn.  Stir well then place on cookie sheet.  Bake at 200 degrees for 1 hour, stirring every 10 minutes.

This recipe came from Jim's mom.  When your not wanting the sticky version of caramel corn, this is the one to use.  To get the kids involved, let them pop the corn and measure it.


The Little Brick Ranch
Related Posts Plugin for WordPress, Blogger...

Top 5 Most Viewed