Thursday, August 16, 2012

Key Lime Bars


Crust:
5 ounces animal crackers (about 2 1/2 cups animal crackers)
3 tablespoons packed light brown sugar
Pinch salt
4 tablespoons butter, melted

Filling:
2 ounces cream cheese, softened to room temperature
1 tbsp grated fresh lime zest (from about 2 limes)
1 can (14-ounce) sweetened condensed milk
Pinch salt
1 large egg yolk
1/2 cup fresh lime juice (from about 3-4 regular limes or 20 Key limes)

3/4 cup shredded coconut, toasted (optional)

Preheat the oven to 325 degrees, adjusting an oven rack to the middle position. Line an 8-inch square baking pan with aluminum foil, letting two opposing edges hang over at least an inch or so. Grease the foil with cooking spray.
For the crust, process the animal crackers, sugar and salt together to fine crumbs in a blender or food processor. Drizzle the melted butter over the crumbs and pulse to incorporate (or stir together in a bowl with a fork). Sprinkle the mixture into the prepared pan and press the crumbs into an even layer. Bake the crust until fragrant and golden, about 15-18 minutes.
For the filling, while crust bakes, in a medium bowl, stir the cream cheese, lime zest and salt together until combined. Whisk in the sweetened condensed milk until smooth (you can use a handheld electric mixer, if you want). Whisk in the egg yolk and lime juice until combined.
Pour the filling evenly over the crust. Bake the bars until the filling is set and the edges just slightly begin to pull away from the sides of the pan, 15-17 minutes.
Let the bars cool completely in the pan set on a wire rack, about 2 hours. Then cover the pan with foil and refrigerate until chilled, about 2 hours. Remove the bars from the pan using the foil overhang and cut into squares. Sprinkle with toasted coconut if desired.

** OH MY!! I am such a lover of Key Lime! These were so scrumptious! I do think the crust was a little too thick. I measured 2 1/2 cups of animal crackers. Next time I will try the 5 oz and see if there is a difference.
**I found this recipe on Pinterest. It came from Mel's Kitchen Cafe! One of my favorite sources!

Monday, August 13, 2012

Count Down....

In 10 days my kids head back to school. I'm sure many of you are gearing back up for the school year too. Well, I am on the count down! I can't wait to make cookies for my girls again! EVERY MONDAY!!

It's been 3 years ago that I started Cookie Monday. We were in a new place (Carson City). My girls were starting in a new school and were not very excited about it. I wanted to do something for them. And that's when Cookie Monday came about. They got to where they would walk in the door every Monday, take a big breath/smell and try to guess the kind of cookie that was baking.

Now we are back in our home (Utah).... And we are keeping it going!! Welcome back Cookie Monday!

Last year we started a Back to School Cookie Celebration. After the first day of school we invited friends over for cookies and milk.  WE ARE DOING IT AGAIN!!  Everyone is invited!

August 23rd
Right after school...
2nd Annual Back to School COOKIE PARTY!
Come have Cookies and Milk
At the Rowley's House!

If you need directions, please leave me a comment with your e-mail and I will get you directions!

Here is one of the cookies I will be making for that day:

1 2/3 cup shortening
1 1/4 cup sugar
1 1/4 cup brown sugar
3 eggs
2 1/2 tsp. vanilla
4 cups flour
1 1/4 tsp. soda
1 1/4 tsp. salt
3 cups chocolate chips
optional: nuts

Cream together shortening and sugars.  Add egg and vanilla.  Mix in dry ingredients, then the chocolate chips.  Bake at 375 degrees for 8-10 minutes.

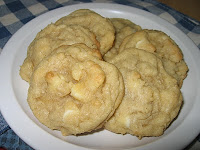
*This recipe came from my mom.  All three chocolate chip recipes that I have posted have the same ingredients, just different amounts.  It does make a difference in the taste of the cookie too.  When I made these I used my "BIG" cookie scoop.  The outsides had a nice warm crunch and the inside was soft and melty.  These didn't last long at our house!

Monday, June 11, 2012

Crockpot BBQ Chicken with a KICK


4-6 pieces boneless skinless chicken breasts
1 bottle Sweet Baby Ray's BBQ sauce
1/4 c vinegar
1/8-1/4 tsp Kick'n Chicken Seasoning.
1/4 c brown sugar
1/2 - 1 tsp. garlic powder

Place chicken in crockpot. Mix all other ingredients together and pour over chicken. Cook on LOW for 4-6 hours.

*This is one of those yummy recipes that I pinned (pinterest) and told myself I HAD TO TRY IT! So glad I did! The whole family loved it. Kids even asked for seconds. Since making this in the crockpot, I have also made it in the dutch oven and it turned out super yummy too!

**I found this recipe HERE...And then instead of using the red pepper flakes, I substituted and use the Kick'n Chicken Seasoning! (I yummy seasoning my sis-in-law told me about...It goes so good in alfredo sauced pasta).

Wednesday, May 9, 2012

Easy Black Bottom Cupcakes


*1 Milk Chocolate Cake Mix
         Mix up cake batter according to directions on package.

*1 (8 ounce) package cream cheese, softened
*1 egg
*1/3 cup white sugar
*1/8 teaspoon salt
*1 cup chocolate chips (can use semi-sweet or milk chocolate)
         Combine cream cheese, egg, sugar, salt and chocolate chips.

Line a muffin pan with cupcake liners. Place about 1 TBS of cream cheese mixture in each cup. Make sure there are a couple chocolate chips in each one. Fill the cup to 2/3 full with cake batter. Bake according to cupcake baking time on cake mix package. Let cool and frost with your favorite chocolate frosting!

**Do you know how kids only take cupcakes so they can eat the frosting?...Well, not with these! The kids gobbled the whole thing up! They went really fast!

**I used the Hershey Kiss Chocolate Chips because I liked having the little bit bigger chocolate chip in them. Definately making these again soon.

**I give credit to my Sister, Julianne for this recipe and also, Allrecipes. com. Julianne made some like these for a family gathering a few years back and I LOVED them. So I searched for the recipe, found the cream cheese part on Allrecipes. com and put them together.

Friday, April 13, 2012

Mini Chicken, Bacon, Cream Cheese Taquitos

1/3 of a 16-ounce package bacon (about 6 slices), chopped
1/2 of an 8-ounce package cream cheese, softened
2 cans (12.5 ounces each) Swanson® Premium White Chunk Chicken Breast in Water, drained (or leftover cooked chicken)
8 flour tortillas (10-inch)
Vegetable oil
1.Cook the bacon in a 10-inch skillet over medium heat until crisp. Remove the bacon from the skillet and drain on paper towels.
2.Stir the bacon, cream cheese and chicken in a medium bowl.
3.Cut each tortilla into 3 (3-inch) circles using a round cutter. Spoon about 2 teaspoons chicken mixture in the center of each (one) tortilla round. Roll the tortillas around the filling and secure with toothpicks.
4.Pour the oil into a heavy 4-quart saucepan to a depth of 3 inches. Heat the oil to 350°F.
5.Add the taquitos to the saucepan in batches and cook until well browned on all sides. Remove the taquitos from the saucepan and let drain on paper towels. Let cool for 5 minutes. Remove the toothpicks before serving.
 
*This recipe is one that I had pinned and ACTUALLY made it!! I found it here on the "Mommy, I'm Hungry!" blog. It is a VERY EASY recipe to put together. You could have the kids help put them together and then an adult do the frying.
**We definitely will be making these again. I would suggest adding some seasoning to the chicken mixture. I added a little onion powder and some chives. My Girls loved them...especially dipped in some Ranch.
Related Posts Plugin for WordPress, Blogger...

Top 5 Most Viewed